Enrollments
This is where the Vendor Enrollment team processes vendor enrollment requests from customers. Customers provide NVP with a list of their vendors. We send vendors an custom URL link to the domestic or international enrollment form, which they complete. The link creates a Zendesk ticket and populates the Ops Toolkit Enrollments List.
The Enrollment List includes two columns — Form Type and Form Path — that tells you what type of enrollment form it is.
Form Type can be Domestic, International, or International-Employee. The Domestic Form Type use a single Digital Enrollment Form that walks vendors through a few questions to determine what type of data to collect. Based on vendor responses, the Domestic Form Type then takes the Form Path of ACH, ACH-Emp, ACH-Update, or MC. The International and International-Employee Form Types are each separate digital forms.
You will still see the old Form Types STD and EMP. These will have a Form Path of UNKNOWN. These are enrollment forms submitted prior to the new single Domestic Digital Enrollment Form.
Getting Started
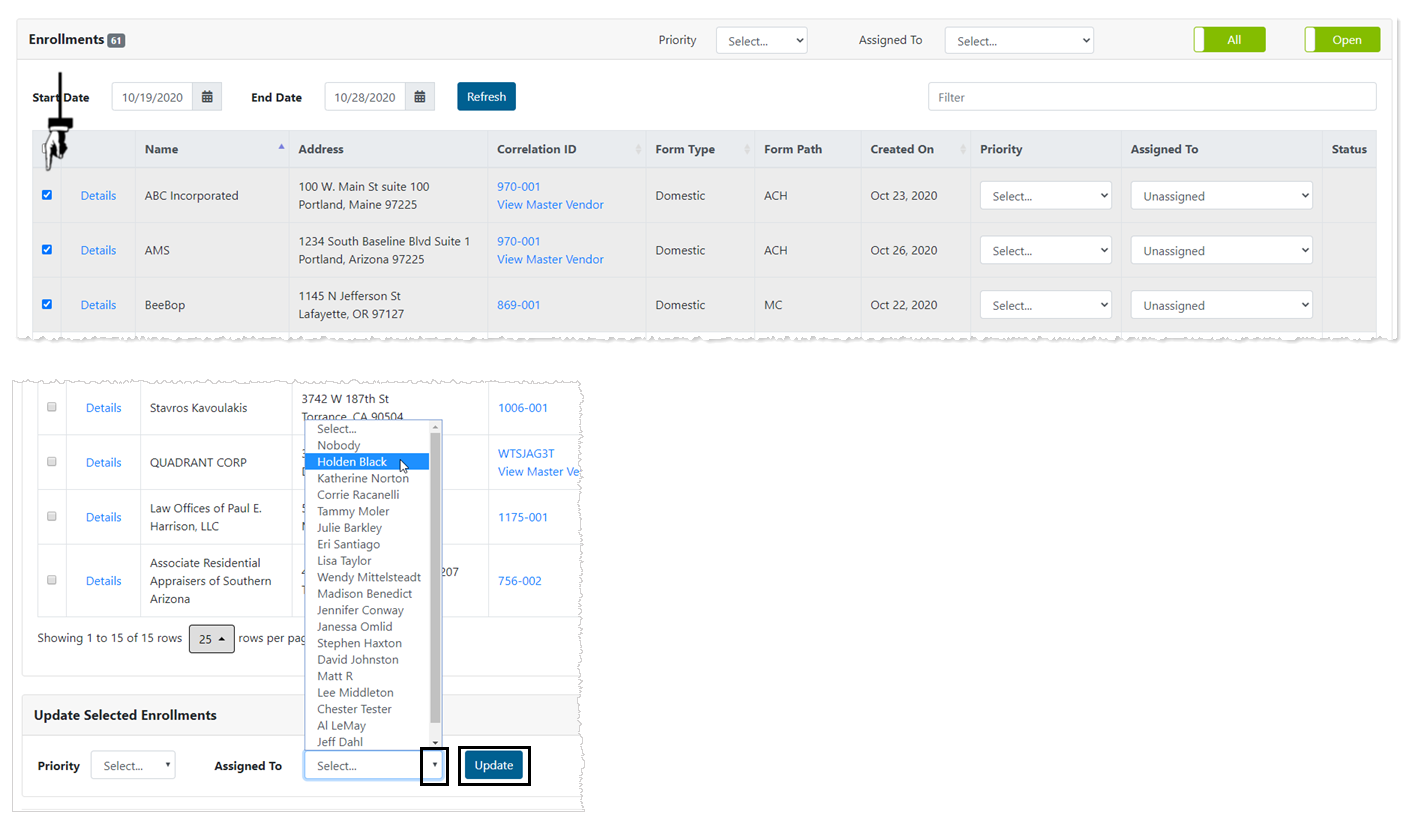
Click Enrollments > Enrollments Listing.
Set the date range you'll be working in.
The End Date does not automatically default to today's date. The Start and End Dates you enter are preserved, only for you, each time you log in. This allows you to work in a date range of enrollments without having to filter your list every time you log in.
Filter by Priority or Assignment
You can use the filter drop-down lists in the upper right portion of the Enrollments Listing page to narrow the list of enrollments. You can filter by Priority, Assigned To, or both.
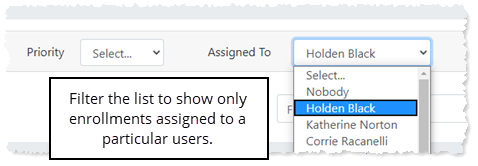
Set the filters back to 'Select...' to return to viewing all enrollments.
Filter by Customer
Copy/paste or type in the Customer ID, located in the Correlation ID column, into the Filter field (not the Search field at the top of the page) to narrow the enrollments list to only vendors for that customer.

Typically, you'll assign enrollments to yourself and set the priority. However, a manager can assign enrollments to Enrollment Operators and set the priority.
You can assign one enrollment at a time or assign them in bulk.
Set Assignment One at a Time
For each enrollment:
- Select the Priority from the drop-down list.
- Select a user from the Assigned To drop-down list.

Use Bulk Assignment
- Click the checkbox for each enrollment you want to assign.
- Scroll to the bottom of the page and
- select the Priority from the drop-down list
- select the user from the Assign To drop-down list.
- Click Update.
Process Vendor Enrollments
We'll go over each section of the Enrollments Details page.
There is no order to verifying customer data. You can run a GIACT check before a master vendor is loaded, or you can load the master vendor first and run the GIACT check later.
Click Details for a vendor enrollment assigned to you to get started.
Is the Master Vendor GUID field populated?
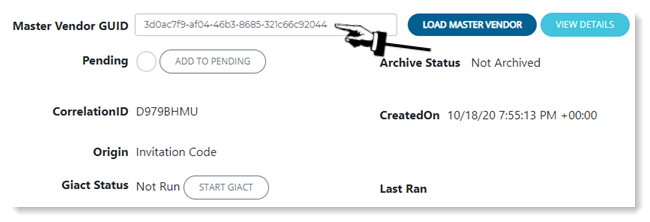
- Yes — This means an invitation code was sent directly to a vendor, which means the Master Vendor GUID is known and is automatically populated.
- No — If the field is not populated, this means an enrollment form was received in email or by fax. So, it's not associated with a Master Vendor GUID yet.
- Search for the vendor in Admin Portal using the name and/or customer number and perhaps the address to identify a match.
- Zendesk provides helpful articles on how to search for vendors in Admin Portal. If you're still unable to find the Master Vendor GUID, please reach out to the vendor to obtain their customer vendor number and then try searching by that.
- If no master vendor record exists for this vendor yet, Zendesk provides helpful articles on how to create a new vendor.
- Once located, copy the Master Vendor GUID in Admin Portal and paste it into the Master Vendor GUID field on the Enrollment Detail page.
- Click LOAD MASTER VENDOR.
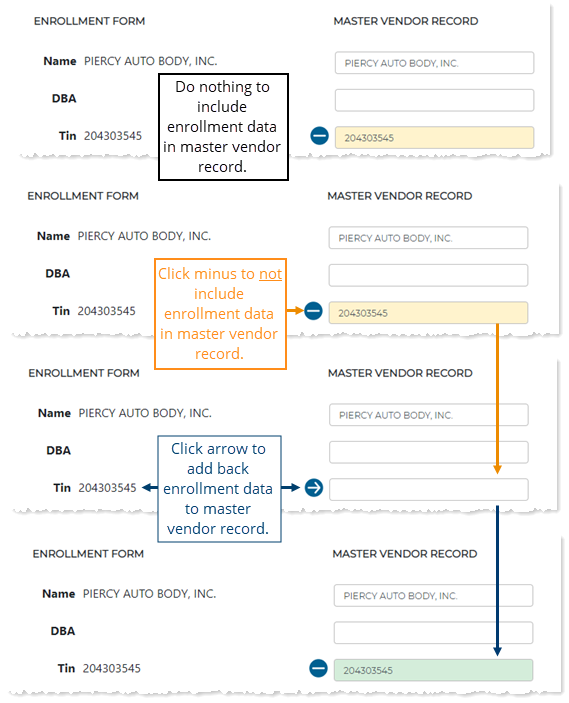
Once the Master Vendor Record is loaded, fields that need attention are highlighted.
- Red — The master vendor record field is different from the enrollment form field.
- Yellow — The data provided in the enrollment form field doesn't exist in the master vendor record. The tool populated the data in the master vendor field for you. (It isn't saved to the master vendor record yet.)
- Green — The master vendor record data is ready to be saved, or the enrollment and master vendor record fields match. Click the minus button to remove it from the master vendor record field.


GIACT is used to verify vendor information. Review the GIACT topic for details on the different types of GIACT verifications that can be run and what to do when a run doesn't pass.
A GIACT verification can run regardless of whether there's a Master Vendor GUID present in the enrollment form.
Click START GIACT if no GIACT verification has been performed.
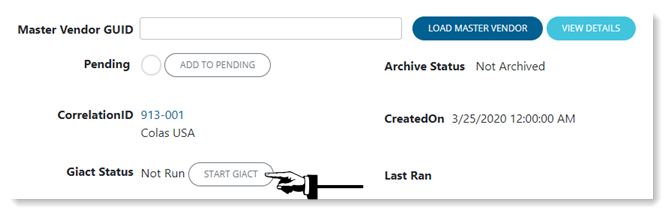
After a GIACT verification has been run, if it did not pass, you may want to put the enrollment form in Pending while you review the GIACT results and follow-up with the vendor.
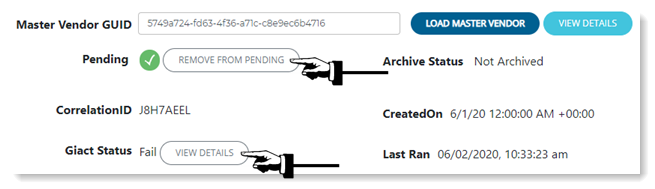
Click VIEW DETAILS when a GIACT verification has already been run to review the results and the GIACT report. The GIACT topic provides details on the GIACT codes and how to follow-up on vendors who's GIACT verification didn't pass.
Compare information between the enrollment form and the master vendor record. Make any necessary adjustments.
Please upload the Master Vendor Record to see highlighted fields and the minus and arrow icons.
You can then use the arrows to copy data to the Master Vendor Record fields or you can manually populate them.
You can check IsCardAccepted and IsACHAccepted.

- Red — The master vendor record field is different from the enrollment form field.
- Yellow — The data provided in the enrollment form field doesn't exist in the master vendor record. The tool populated the data in the master vendor field for you. (It isn't saved to the master vendor record yet.)
- Green — The master vendor record data is ready to be saved, or the enrollment and master vendor record fields match. Click the minus button to remove it from the master vendor record field.
Standard Enrollments
Click the selection buttons under General for card and/or ACH. Typically, customer specific is only selected on Employee Enrollment forms. See that example below.

Employee Enrollments
Click the selection buttons under Customer Specific for card and/or ACH.

Click the arrows to add contact data from the enrollment to the master vendor record fields.

Click the minus to remove the data from the master vendor record fields if you changed your mind about adding it.
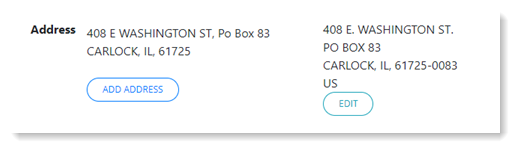
If no address shows on the Master Vendor Record side, click Add Address.
If both the enrollment form and Master Vendor Record fields show an address, but they're different, click Edit to update the Master Vendor Record fields.
If the Enrollment Form banking information fields are empty, but a voided check is included, you can manually enter the data in the Master Vendor Record fields.

- Red — The master vendor record field is different from the enrollment form field.
- Yellow — The data provided in the enrollment form field doesn't exist in the master vendor record. The tool populated the data in the master vendor field for you. (It isn't saved to the master vendor record yet.)
- Green — The master vendor record data is ready to be saved, or the enrollment and master vendor record fields match. Click the minus button to remove it from the master vendor record field.
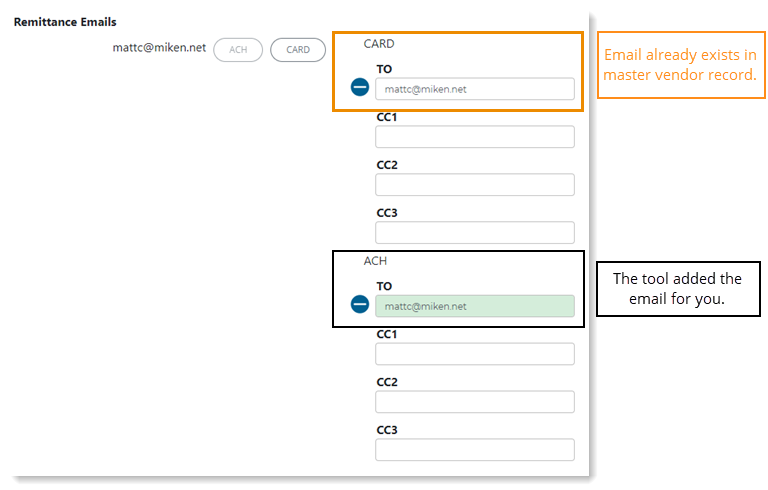
Email addresses already on file in the Master Vendor Record are displayed without highlight.
Email addresses that are not in the Master Vendor Record are automatically input into the Master Vendor Record fields for you. Click the minus to remove them. Click the ACH or Card buttons to copy emails back to the Master Vendor Record fields.
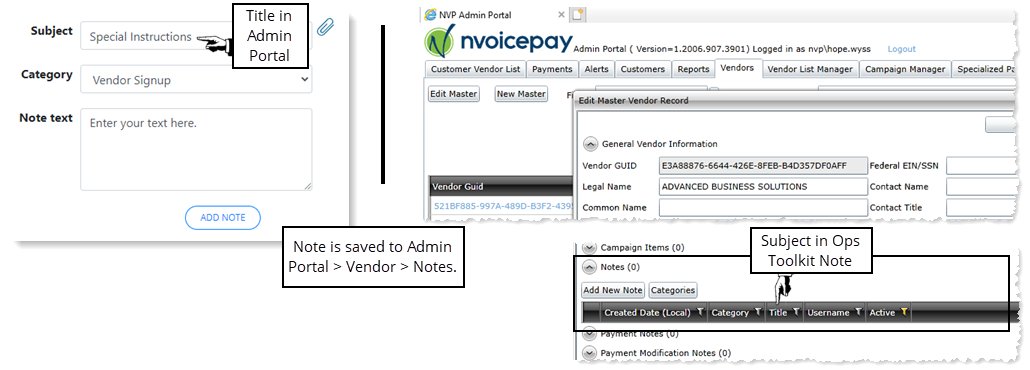
Enter any Notes that need to be recorded in the Master Vendor record.
(Optional) Click the paperclip to select a file from your local computer to include with the Note.
Once the UPDATE MASTER VENDOR is clicked, the note and any attached file posts in Admin Portal to Vendor > Notes.
Click UPDATE MASTER VENDOR when you've finished verifying data. The enrollment is automatically archived.
An enrollment gets archived under two circumstances:
-
when UPDATE MASTER VENDOR is clicked once you've finished verifying all the vendor data
-
when we have identified that this enrollment data is not associated with a specific vendor and, therefore does not need to be saved
An enrollment is marked as duplicate when we have verified that the vendor has submitted the form with the same data more than once.
The Send Welcome Email button will be implemented later.